How Can We Help?
Do you collect the tracking numbers of orders in your store? If yes then is it possible for your customers to track the orders on your website? Can you at least send the tracking numbers by email to them?
Ideally, you as dropshipper should have all these features in your store.
In this article you’ll learn how to setup such function in your Woocommerce store using order tracking addon.
Quick note:
If you’re a dropshipper and use Ali2Woo, you may know that it collects tracking numbers from AliExpress automatically. In this post we will show additional (advanced) order tracking techniques.
Let’s get started:
- Video about order tracking features
- What features come with tracking addon?
- Set up the plugin settings
- Use the Tracking list
- Synchronize the specific tracking codes if needed
- Use the special short-code to track orders in the website frontend
- How to change email template and other templates containing tracking information?
- Best practices for using the tracking plugin
Video about order tracking features
In this video we’ll show:
- What tracking features are built-in in Ali2Woo (our plugin for dropshippers)
- Additional (advanced) features that become available if you install the tracking addon
What features come with tracking addon?
Main features:
- Show tracking numbers in email notifications for your customers
- Show them in your client personal accounts and on the order page for site administrator
- Integrate with tracking services: 17Track, Cainiao, AfterShip
- Add a tracking form on your website using a special short-code
- Customize the tracking templates for email notifications, personal accounts and admin panel
- Add new “Shipped” status to the list of default WooCommerce order statuses. It creates a separate email notification and template that you can override in your theme. (new feature!)
Features that require AfterShip API Key:
- Daily automatic synchronization of tracking information
- Automatic detection of carrier code by tracking number
- Automatic changing of the WooCommerce order status if related tracking numbers get the “Delivered” state
- Manual synchronization function for specific tracking numbers
- Split tracking numbers into groups depending on their state: Pending, Shipped, Delivered, etc.
Set up the plugin settings
You can find all tracking settings in WooCommerce > Settings > AliExpress Tracking
Now let’s take a closer look at each parameter.
1. Tracking service
Initially, there’re four values: None, 17Track, Cainiao, AfterShip.
Do you want tracking numbers to be links?
So your customers will be redirected to the website of the chosen tracking service when clicking on the tracking number.
Select one of the tracking services, otherwise leave None.
Additionally, if you want to use your own tracking form and not transfer users to an external site, then use a special short-code.
2. Add Shipped order status
By default in Woocommerce there are several order statuses like: Pending payment, Processing, Completed and etc. Sometimes you need more statuses. In our experience the most popular order status that people want to add is “Shipped”.
So this option add the “Shipped” order status and generate a new email notification for it. It means when any order gets such status, a customer will receive an email.
You can customize the email template of the notification, just create the following file in your theme and edit it: [your-theme]/woocommerce/emails/admin-new-order.php
3. AfterShip API Key
Some plugin features are available are available after adding your AfterShip API Key.
You can get it by following the instructions.
4. Enable tracking codes synchronization
This option enables automatic updating of the status of tracking codes using AfterShip.
5. A list of couriers for auto detect
Adding new tracking code, the plugin can automatically identify carrier according to the tracking code format.
However, in AfterShip detection works based on given list of carriers.
For example: dhl, ups, fedex, hong-kong-post
To find out the carrier identification code in AfterShip and to get the current list of supported carriers, check out this page.
6. Delivered status logic
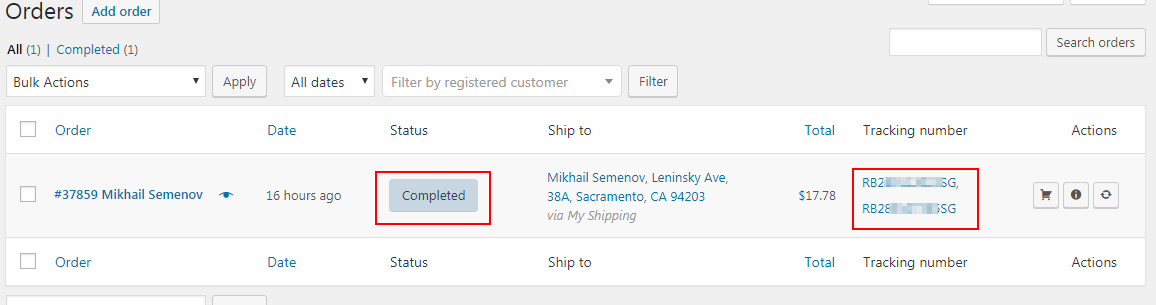
An order in WooCommerce may contain several tracking numbers.
So each order item has its own number.
Therefore, it is often necessary to change order status to “Completed” if all tracking codes have become “Delivered”.
Next, consider a specific example.
Let’s say there is an order on AliExpress with two Xiaomi phones.
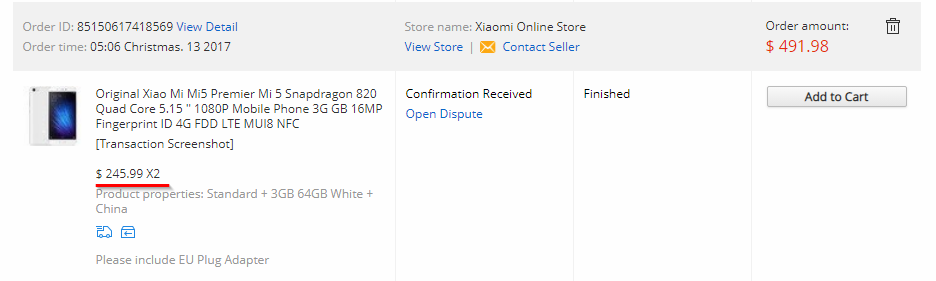
As you can see each product has its own tracking number.
When both tracking numbers become “Delivered”, the AfterShip API will notify plugin about this.
After that the corresponding order in WooCommerce will be marked as “Completed”.
Use the Tracking list
All tracking numbers added to WooCommerce orders are displayed on the WooCommerce> Tracking List page.
For convenience, tracking numbers depending on their status are divided into different categories:
- Error
- Publish
- Pending
- Delivered
- Expired
- Intransit
- Outfordelivery
- Inforeceived
- Failedattempt
- Exception
Firstly, Error and Publish are statuses added by the plugin. Others are assigned in AfterShip.
Publish has a new tracking number that has not yet been synchronized.
Error are tracking numbers with some kind of synchronization error.
Moreover, you can find the description of the AfterShip statuses here.
Synchronize the specific tracking codes if needed
Sometime you may want to run the synchronization manually.
So you don’t need to wait for automatic updates always.
Mark the necessary tracking numbers, select the Tracking Sync function and that’s it.
Please note that sometimes AfterShip cannot determine carrier code automatically.
It may happen for some tracking numbers.
In this case, you need to go to tracking editing and set the courier code manually.
Use the special short-code to track orders in the website frontend
The plugin implements a special short-code [wcae-track].
Just add it to any page or post on your site.
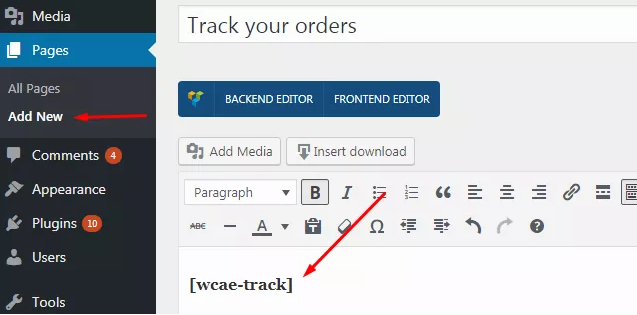
After that the 17Track service form will appear on the page.
So your website visitors can check their tracking numbers there.
Consider an example:
Please note this is the iframe form.
That’s why you cannot change its design.
But it is possible to change a design of the button and of the search field.
To do that, just edit the appropriate template.
In addition, adding a short-code to page, this page becomes available for selection in the Tracking service field.
For example, in the following screenshot, we put the short codes on two pages.
You can choose any of them.
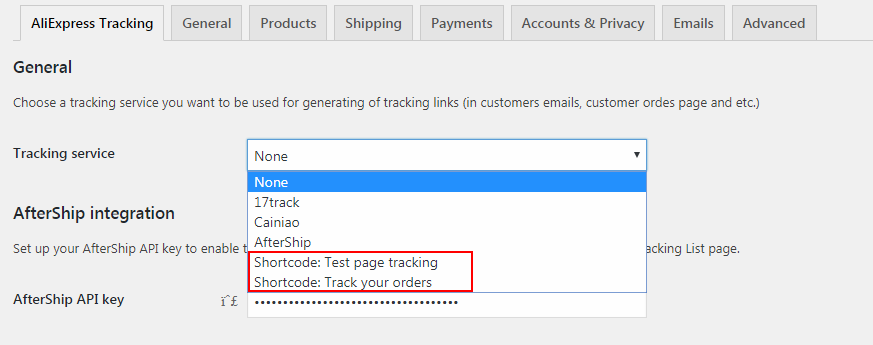
Just a reminder that, during the choice of this page as a Tracking service, the tracking numbers (in notifications, order, account page, etc.) will lead to the tracking form located on the selected page.
How to change email template and other templates containing tracking information?
The tracking information is displayed through the templates.
So email notification, user account and shortcode – all have separate template that can be changed.
To know a template name and its structure, check the addon folder containing the templates:

Please don’t edit these templates directly, instead override appropriate file by creating its copy in your active theme folder.
For example: to edit tracking information template add [your-theme]/wcae-shipment-tracking/email/tracking-info.php
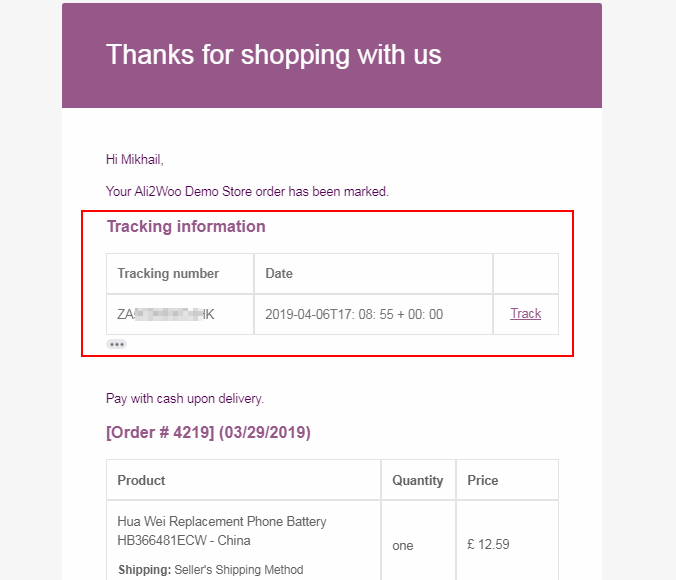
See the red line highlights an area of the email template that you can change by editing the tracking template:
If you want to change not only that area, but the whole notification template you have to change the corresponding WooCommerce template.
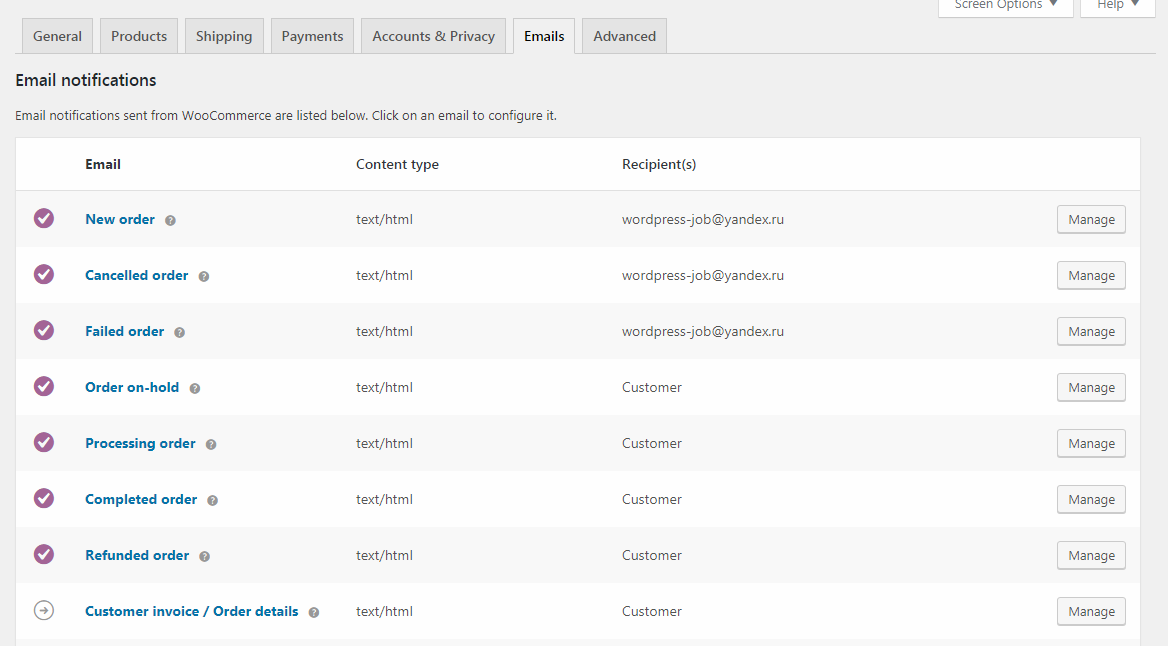
WooCommerce has several notification templates depending on the status of the order.
All available WooCommerce notification templates you can find in
WooCommerce> Settings-> Emails
Also there option to choose which notifications WooCommerce sends automatically.
If you added the Shipped order status as it we described earlier in this guide, remember its location: [your-theme]/woocommerce/emails/admin-new-order.php
Best practices for using the tracking plugin
After the publication of this article, we saw that some dropshipers still have questions about the configuration of this add-on and some of its features.
In this section, we will try to answer those questions and share the best practices for using the tracking addon.
1. How to email a customer when i have add a new tracking number to the order?
Popular question is how to send emails to a customer at the moment when an order gets the tracking codes from AliExpress.
Solution:
- Find the Tracking Code Order Status option in Ali2Woo settings. When you import tracking codes to your order, Ali2Woo changes the order status to the Tracking Code Order Status.
- Add a new order status for this purpose, for example: Shipped. You can add the Shipped status by enabling an appropriate option in the tracking addon settings.
- As a result, when your order gets the tracking codes, the status is changed to Shipped automatically. Also, an email is sent to your customer.
By the way, if you want our specialist to help you to set up this behavior, contact support, we send you the quote.
Comments open